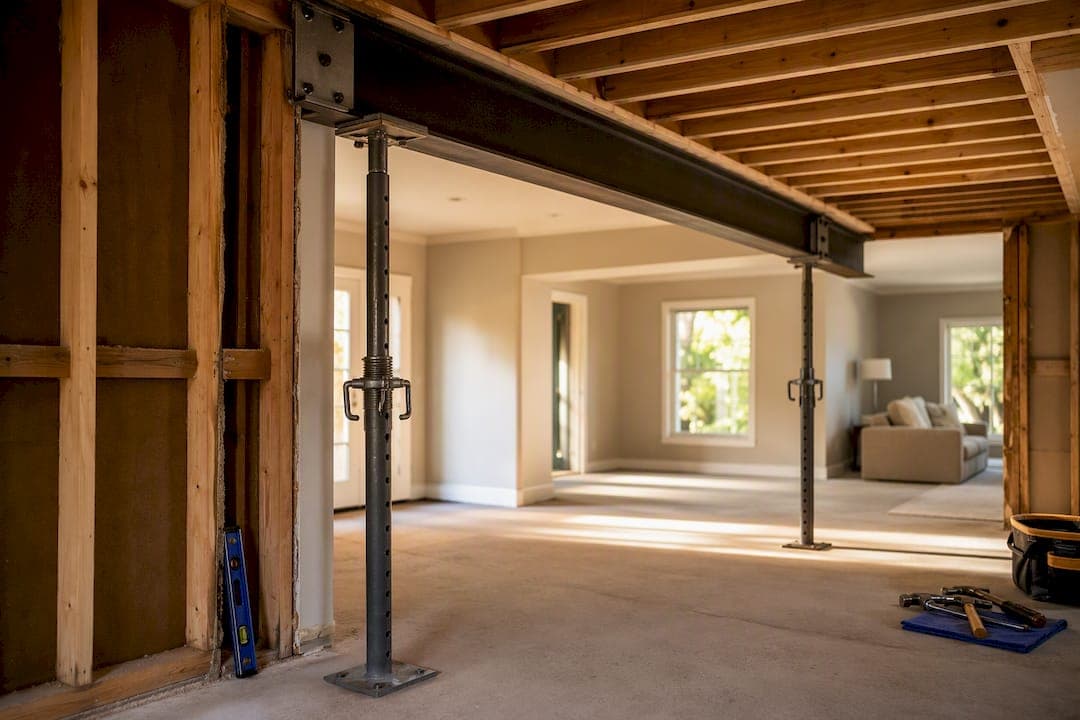
Removing a load-bearing wall is a feasible project, but only when three conditions are met first: structural-engineer-stamped plans, temporary shoring installed before any cutting begins, and a properly sized replacement support system of beam, posts, and footings. If a wall in your home might be load-bearing, stop before you touch it. Confirm its status with plans or a qualified professional, and do not demolish anything until shoring is in place and carrying the load.
TL;DR:
- Proper shoring, stamped plans, and an appropriately sized support beam are essential before removing a load-bearing wall to ensure house stability.
- Visual clues like perpendicular walls to joists or stacking over foundations help identify potential load-bearing walls, but only a licensed engineer can confirm definitively.
- The project timeline ranges from two to six weeks for approvals and several days for on-site work, with completion records crucial for resale and insurance.
- Most dangerous failures come from skipping steps, such as cutting before shoring is confirmed, leading to structural sagging, cracking, or partial collapse.
- Using a managed, design-build team simplifies permits, inspections, and coordination, reducing risks and ensuring code compliance during home renovation.
Table of Contents
- How to tell if a wall might be load-bearing
- Permits, inspections, and the timeline you should expect
- Safe step-by-step sequence homeowners and contractors follow
- Beam options and sizing trade-offs
- DIY versus hiring a licensed team
- Potential structural consequences of improper removal
- Alternative design solutions and impact on space layout after removal
- Typical post-removal issues and maintenance considerations
- How we think about load-bearing wall projects
- If you'd rather have a team manage the whole project
- Sources
- FAQ
How to tell if a wall might be load-bearing
A few visual clues point toward a bearing wall, though none of them confirm it on their own. Walls that run perpendicular to the floor joists above, stack directly over one another from floor to floor, or sit above a foundation footing or center beam often carry structural load. Interior partition walls that run parallel to the joists are more commonly non-bearing, but "more commonly" is not the same as certain.
These clues are a starting point for triage, not a verdict. Older homes get remodeled, additions shift load paths, and a wall that looks decorative can still be holding up a second story.
- Check whether the wall runs perpendicular to the joists visible in your attic or basement.
- Look for the wall stacking directly over a foundation wall, beam, or another wall on the floor below.
- Pull permits or blueprints from your local building department if they exist.
- Call a structural engineer or a qualified contractor for a physical inspection when the answer isn't obvious.
Only a licensed structural engineer or a qualified contractor can definitively confirm bearing status. Visual indicators help you know when to ask, but they are never a substitute for someone who can read your framing and your loads.
Permits, inspections, and the timeline you should expect
Most jurisdictions require stamped structural drawings and an approved building permit before you alter a load-bearing wall. Some cities enforce this more tightly than others: Portland's municipal code lays out specific demolition and structural alteration requirements, and similar strict permit conditions exist in other cities. Check your local building department's code before assuming a lighter-touch process applies to you.
The timeline usually breaks into three phases. Engineering and permit review typically take between two and six weeks, since most load-bearing wall removals require a permit and stamped drawings before an inspector will sign off. The physical work, meaning shoring, demolition, and beam installation, often takes just one to three days once approved. Finishing drywall, trim, and paint, plus scheduling the final inspection, adds a few more days on top of that.
- Engineering and permit review: roughly two to six weeks depending on your jurisdiction.
- On-site structural work: about one to three days for shoring, demolition, and beam installation.
- Finishing and final inspection: several additional days before the space is fully closed up.
Keep every signed permit and inspection record once the project wraps. Buyers and their agents ask about structural work during resale, and an undocumented wall removal can stall a sale or trigger a price renegotiation even years later.
Safe step-by-step sequence homeowners and contractors follow
The sequence matters as much as the individual steps. Skipping ahead, especially cutting before shoring is confirmed, is where most serious accidents and structural failures happen.
- Confirm the wall's bearing status, locate any electrical, plumbing, or HVAC lines inside it, and obtain stamped engineering plans and your permit.
- Build temporary shoring walls on both sides of the wall you're removing, positioned about three to four feet out from the wall itself.
- Cut the shoring studs slightly over-height, roughly a quarter inch, so they wedge tightly against the ceiling and actually take on load rather than just standing nearby.
- Remove drywall and wall studs only once you've confirmed the shoring is carrying the structure above.
- Install the new beam and support posts exactly as specified in the stamped drawings, verifying that both ends of the beam reach adequate footings.
- Have your inspector verify the installed beam before you close up any drywall, then remove the shoring and finish the space.
Pro Tip: Size shoring to the load, not to convenience. Undersized or poorly positioned shoring is a common point of failure between demolition and beam installation.
Each step depends on the one before it. An inspector who sees drywall already closed over a beam has no way to verify it matches the stamped plans, which is why that inspection happens before finishing, not after.
Beam options and sizing trade-offs
The beam you choose affects cost, headroom, and how the ceiling looks once the project is done, but an engineer determines the final specification based on the load, not personal preference.
- LVL (laminated veneer lumber): Compact and widely used for modest residential spans, and generally the most straightforward option to source and install.
- Glulam: Engineered wood built for situations where the beam stays exposed as a design feature, suited to medium spans.
- Steel: The choice for long spans or heavier loads, though it's heavier to maneuver and often requires special lifting equipment on site.
Beam and installation method drive a large share of the total budget. Average project costs commonly fall between roughly $3,000 and $6,760, with wall size, story count, and utility relocation all pushing the number up or down.
A longer span or heavier steel beam can also force new or larger footings beneath the posts supporting it, since concentrating that much load onto a small footprint needs concrete rated for it. That decision belongs to your engineer's calculations, not a general contractor's estimate.
DIY versus hiring a licensed team
Some parts of this project are reasonable for a capable homeowner to handle. Others are not, and treating them as interchangeable is how small mistakes become expensive ones.
- Reasonable to DIY: demolition once shoring is confirmed and carrying load, debris cleanup, and some cosmetic finishing work like painting or trim.
- Hire a licensed professional for: the structural assessment and load calculations, beam sizing and installation, new footing work, and permit filing plus inspection coordination.
- Vet any contractor for: an active license, current insurance, references specific to structural projects, and a working relationship with a structural engineer.
Demolition is easy to do yourself once the shoring is holding the load. The structural replacement, the beam, the posts, the footings, is the part that determines whether your house stays safe, and that part belongs with licensed professionals who carry the credentials to back their calculations.
Potential structural consequences of improper removal
A wall removed without proper shoring or an undersized replacement beam does not fail immediately in most cases, which is part of what makes the mistake dangerous. Sagging floors above, cracked drywall or plaster, doors and windows that suddenly stick, and hairline cracks spreading from corners are common early warning signs that a structure is settling under a load it was never engineered to carry.
Left unaddressed, these symptoms tend to worsen. A beam sized by guesswork rather than by tributary width, dead load, and live load calculations can deflect more than it should, transferring stress to framing and connections that weren't built for it. In the more serious cases, an improperly supported opening can lead to partial collapse of the floor or roof structure above, particularly under snow load, furniture concentration, or a full house of guests.
Resale creates its own consequences. An inspector or appraiser who spots an altered wall with no permit record on file can flag the property, delay a sale, or require retroactive engineering review before closing. Insurance claims tied to structural damage can also be denied when the work wasn't permitted or inspected. The fix for all of this is the same: engineering, shoring, and permits done correctly the first time, not a repair after the fact.

Alternative design solutions and impact on space layout after removal
Full wall removal isn't the only way to open up a floor plan, and it isn't always the right call for every layout or budget. A partial opening, sometimes called a pass-through, keeps a header beam and short knee walls in place while creating a wider visual and functional connection between two rooms without the same footing and beam requirements as a full removal.
Pocket doors and wide cased openings offer a middle ground for homeowners who want flexibility to close off a space later, useful for a home office or guest room that doubles as another function. A half wall or open shelving unit built where the wall used to stand can also define zones in an open floor plan without a full structural rework.
Full removal genuinely changes how a home lives day to day. Kitchens gain sightlines to living areas, natural light travels farther across a floor, and furniture arrangement stops being dictated by where a hallway wall used to sit. The trade-off is that you lose the wall's ability to separate noise, smells, and mess between spaces, something worth weighing before committing to the largest possible opening. Your engineer's evaluation of the wall's load, discussed earlier, also shapes which of these options is realistic for your specific structure.
Typical post-removal issues and maintenance considerations
Most issues that show up after a wall removal are cosmetic rather than structural, provided the engineering and installation were done correctly. Minor drywall cracks at the seam where old and new ceiling meet are common as the house settles slightly around its new load path, and they're normally a paint and patch fix rather than a warning sign. Flooring transitions where the wall used to sit sometimes need a matching patch if the original flooring wasn't continuous underneath.
New beams, particularly steel ones, can occasionally telegraph through a finished ceiling as a faint line if the drywall wasn't shimmed or furred out properly during finishing. It's worth asking your contractor how they plan to conceal the beam before installation, not after the ceiling is closed. Wood beams like LVL and glulam can also experience minor seasonal movement, so hairline cracks at the beam-to-ceiling joint aren't unusual in the first year.
Ongoing maintenance is mostly about paying attention. Recheck for new cracks, sticking doors, or uneven floors in the months after the project, especially through a full change of seasons, since that's when settling shows up most. Keep your stamped plans and permit paperwork on file. If you ever renovate again nearby, that documentation saves your next contractor from re-verifying what's already been engineered and approved.

How we think about load-bearing wall projects
Removing a load-bearing wall is one of those projects where the demolition is the easy part and the engineering is where the real work happens. The homeowners who get into trouble are usually the ones who treated the wall as a demo job first and a structural question second, instead of the other way around.
A managed, design-build approach tends to serve homeowners best on this type of work, particularly when a project touches multiple trades: framing, electrical, drywall, and finish carpentry all have to sequence correctly around a beam installation. Coordinating that yourself, on top of chasing permits and inspections, is where a lot of projects lose time and money. A managed, design-build approach treats the engineering and permitting as the foundation of the schedule rather than an afterthought, supporting quality and schedule focus.
— Alston
If you'd rather have a team manage the whole project
If coordinating an engineer, a permit office, shoring, a beam installer, and a final inspection sounds like more than you want to run yourself, that's exactly the gap a design-build team fills. A design-build team can handle site assessment, engineering, permit coordination, beam and post installation, plus inspections and finishing work under one accountable team rather than multiple separate contractors.

Some design-build teams offer free, no-obligation estimates before contracts are signed, and workmanship guarantees on completed projects. Once demolition and framing are done, a drywall and finishing checklist can help you protect nearby rooms from dust while the beam gets closed in. If you're in Southwest Florida and ready to talk through your wall removal or larger renovation, request your free estimate from NG Construction SWFL and get a clear, code-compliant plan before anyone picks up a sledgehammer.
Sources
- How to Remove a Load-Bearing Wall - This Old House
- How to Remove a Load-Bearing Wall - Home Depot
- Cost to remove a load-bearing wall - HomeAdvisor
- Portland
FAQ
How much of a load-bearing wall can I remove?
The amount depends entirely on your engineer's calculations for that specific wall, since the load, span, and available footing locations all vary by house. Some walls allow a full-width opening with a single beam, while others need a shorter opening or an additional support post to keep the beam size manageable.
Can you remove a load-bearing wall yourself?
Parts of it, yes: demolition after shoring is confirmed and carrying load is a reasonable DIY task for a capable homeowner. The structural assessment, beam sizing, footing work, and permit filing need a licensed structural engineer or qualified contractor, since a miscalculated beam can lead to sagging floors or worse.
What is the average cost to remove a load-bearing wall?
Average project costs commonly land between roughly $3,000 and $6,760, depending on the wall's span, story count, and whether utilities need rerouting. Hidden electrical, plumbing, or asbestos issues inside the wall are common reasons a project runs above the initial estimate.
Can you still remove a load-bearing wall?
Yes, load-bearing walls are removed regularly in renovations, provided the project follows the required process: stamped engineering plans, a building permit, proper temporary shoring, and an inspected beam installation. Some municipalities enforce stricter demolition and permitting rules than others, so it's worth checking your local building code before starting.